
nextjs 2 years ago
博客大纲
简介
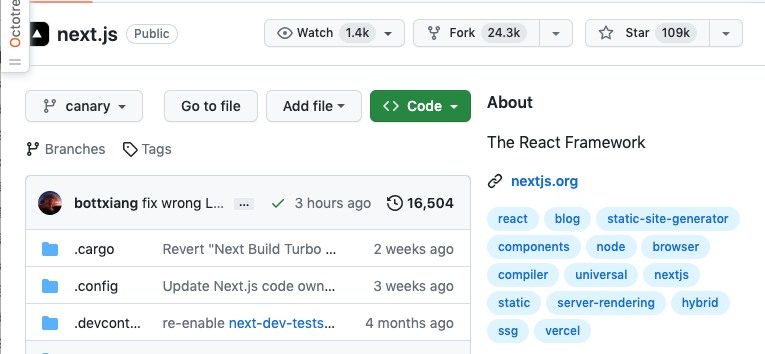
next.js一款非常优秀的、react服务端渲染(SEO)框架,它是全栈式的, github star 高达 108K
主要特性:
- 1.文件系统路由:支持布局、嵌套路由、加载状态、错误处理等
- 2.渲染:客户端渲染,服务端渲染,混合渲染
- 3.数据获取:
fetch()API 配合async/await - 4.css:支持module css,CSS-in-JS,Tailwind CSS
- 5.优化:服务端可以使用Image, Fonts, Script来提升用户体验
- 6.tyscript支持
- 7.可供参考的API
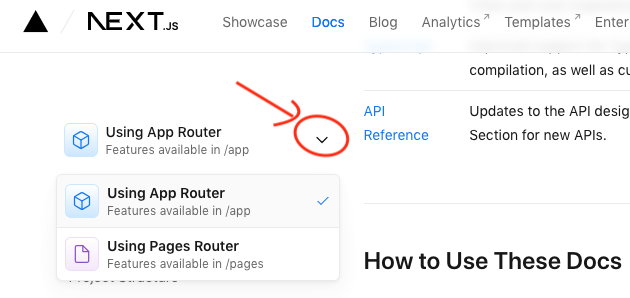
需要注意的是next.js有2套文档:App Router docs 和 Pages Router docs,中文网版本的只提到了后者
在英文文档处,可以通过点击下面的下拉按钮快速切换文档
next.js是有学习门槛的,你需要有react基础,如果你还不知道什么是react,可以看下官方推荐的教程:
安装
系统要求:
- Node.js 16.8 or later.
- 支持 Macos, windows, linux
# 快速构建项目
$ npx create-next-app@latest
# or 在当前目录创建
$ npx create-next-app@latest .
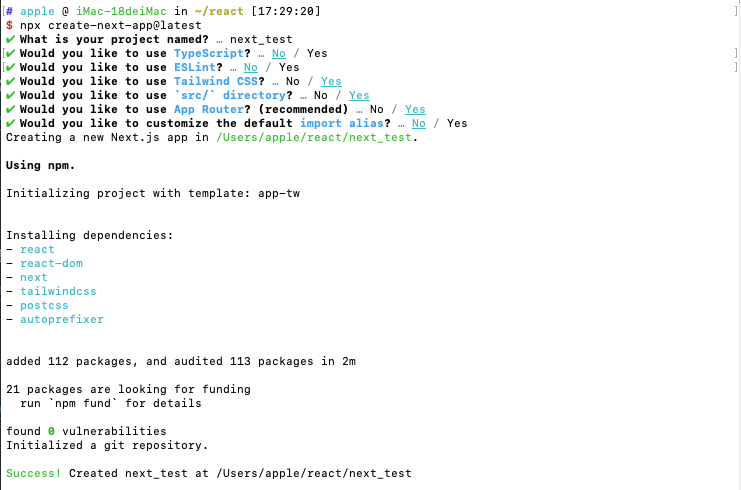
# 启动
$ npm run dev
可以看到next.js的启动是非常快的,接着浏览器访问 http://localhost:3000 就可以看到效果了
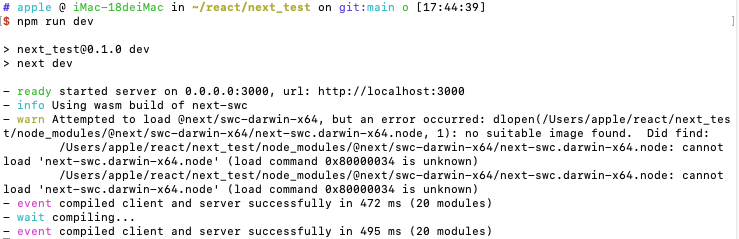
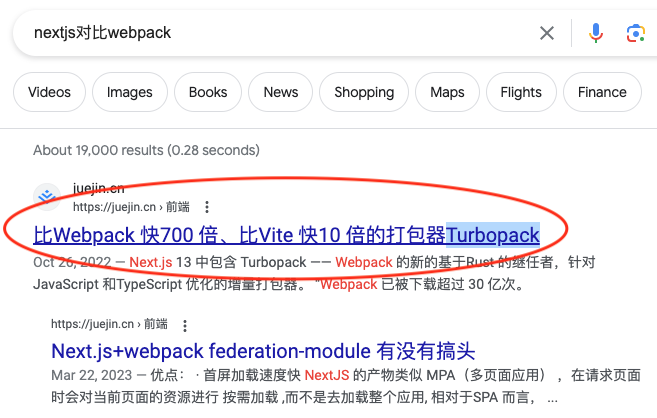
next.js使用Turbopack打包,网上有人晒出其比webpack快700倍,比vite快10倍
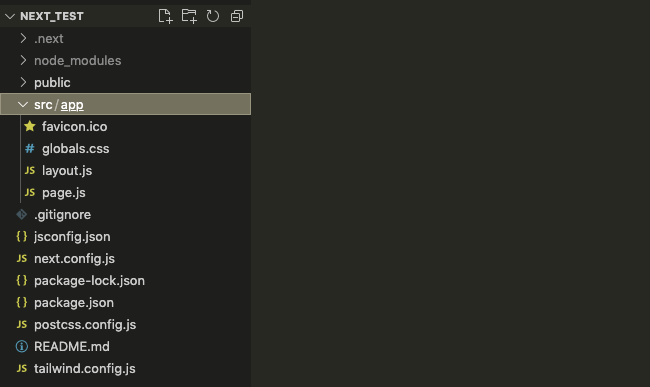
文件结构:
什么时候用服务端渲染,什么时候用客户端渲染
默认情况下app目录下的所有文件都是服务端渲染,除非你用"use client"在文件的第一行声明
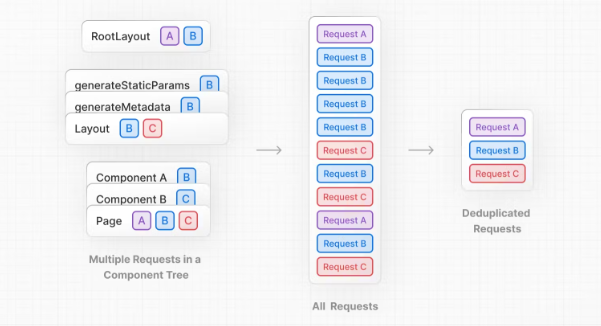
官方给出了一个表格:
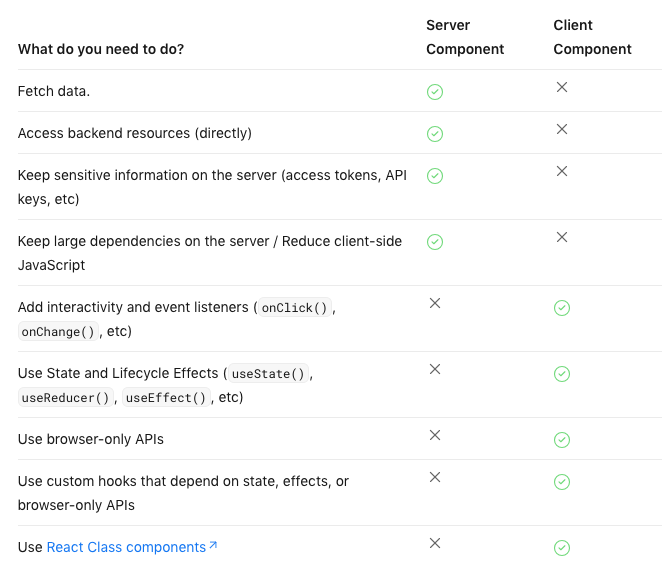
可以看到极少情况下,只有当与客户端交互时才会用到客户端渲染,eg:js事件,useXXX相关的 hook api,使用浏览器特有的api(调用window对象),使用react class component
APP路由
路由必须定义在app目录下方可生效
路由定义
定义路由的语法很简单 就是一个普通的js/jsx/tsx组件,值得注意的是不需要引入react, eg:
export default function Page() {
    return <h1>Hello, Next.js</h1>
}

//or
export default () => (
    return <h1>Hello, Next.js</h1>
)
路由约定
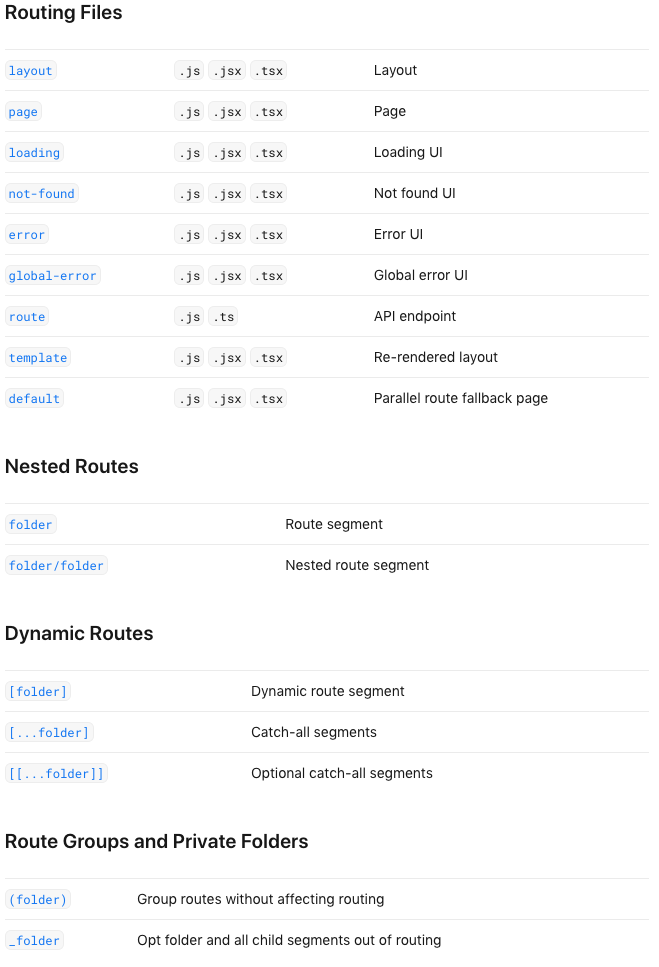
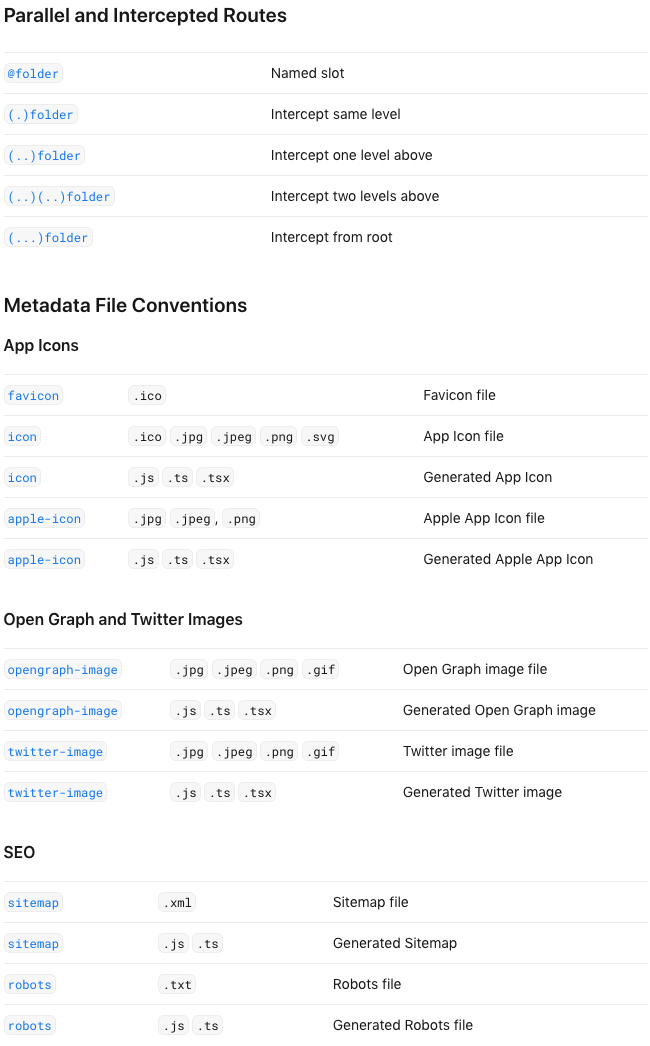
上面的 路由约定 是什么意思呢?
以Routing files为例,这些files都必须是react组件,后缀名可以是js jsx或者tsx
比如你想定义一个从浏览器 http://127.0.0.1:3000/movie 就可以访问到的路由,那么你的组件结构必须是: app/movie/page.js[x] or app/movie/page.ts[x]
folder就是路由的segment
又再比如你想定义一个从浏览器 http://127.0.0.1:3000/fav/movie 就可以访问到的路由,那么你的组件结构必须是: app/fav/movie/page.js[x] or app/fav/movie/page.ts[x]
路由就像文件系统一样,清晰明了,next.js 通过约定自动注册路由,免去了我们注册路由的麻烦
看上去是不是很简单,值得注意的是只有名为page.js的文件才是可见的
打个比方,我在app/moive目录下定义了3个js

如果我在浏览器访问 http://127.0.0.1:3000/fav/movie是访问不到其中任意一个js组件的,只会显示404,除非我们再在movie.js里定义一个page.js组件
Routing files 写的很清楚,如果你想定义loading组件,只需定义一个loading.js; 如果想重写404,只需定义一个not-found.js即可, 后面的file从字面就可以看的出来用途,就不再一一列举了
动态路由
什么是动态路由呢?打个比方,通过id访问博客,前面的http://127.0.0.1:3000我就省略了
假如有类似的url
- /blog/111
- /blog/222
- /blog/333
我们不可能也绝不能傻傻的定义以下这种组件(id是数据库的bid)
- /blog/111/page.js
- /blog/222/page.js
- /blog/333/page.js
那么如何定义动态路由呢?
看说明:
[folder] Dynamic route segment
我们只要给folder加个[]即可将folder变为一个slot,这个slot承载的就是一个变量

可以看到成功访问页面

动态路由如何获取参数呢
next.js组件会自动接收一个封装好slot的params对象
我们修改下代码:
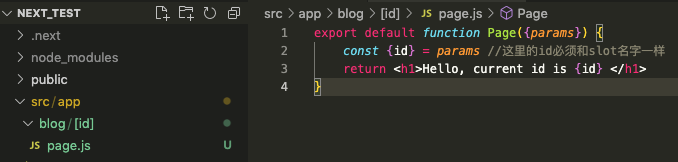
再次访问页面


可以看到已成功获取动态id
那么ts中如何获取路由参数呢?请看下面的demo
export default function Home({ params }: { params: { id: number } }) {
    const { id } = params
    return <>
        hello, current id is {id}
    </>
}
我们把情况稍微设的复杂点
.
└── app
    ├── blog
    │   └── [id]
    │       ├── page.tsx
    │       └── review
    │           └── [reviewid]
    │               └── page.tsx
    ├── favicon.ico
    ├── globals.css
    ├── layout.tsx
    └── page.tsx
app/blog/[id]/review/[reviewid]/page.tsx:
export default function Home({ params }: { params: { id: number, reviewid: number } }) {
    const { id, reviewid } = params
    return <>
        id: {id}, reviewId: {reviewid}
    </>
}

路由导航
有2种方式可以实现路由导航
1.<Link>组件
//`<Link>`组件
import Link from 'next/link'

export default function Page() {
  return <Link href="/dashboard">Dashboard</Link>
}
2.useRouter hook
'use client'
//`useRouter` hook

import { useRouter } from 'next/navigation'

export default function Page() {
  const router = useRouter()

  return (
    <button type="button" onClick={() => router.push('/dashboard')}>
      Dashboard
    </button>
  )
}
Scrolling to an id
<Link>的默认行为其实和a标签是一样的,如果href中有#id,会自动scroll
Checking Active Links
定义一个Navigation组件,用于渲染<Link/>(Navigation的位置可以随意放,官网给的demo是app/ui/Navigation.js)
import { usePathname } from 'next/navigation'
import Link from 'next/link'

export function Navigation({ navLinks }) {
  const pathname = usePathname()

  return (
    <>
      {navLinks.map((link) => {
        const isActive = pathname.startsWith(link.href)
        // console.log("url:",link.href)
        // console.log("is active:", isActive)
        // 这里会随着服务重启只会执行一次
        return (
          <Link
            className={isActive ? 'text-blue-500' : 'text-black'}
            href={link.href}
            key={link.name}
          >
            {link.name}
          </Link>
        )
      })}
    </>
  )
}
使用<Navigation/>
"use client"
//这里必须使用"use client" directive
//因为Navigation使用了life cylcle effects: usePathname()
import { Navigation } from '../../ui/Navigation'

const navLinks = [
    {
        name: "movie",
        href: "/movie"
    },
    {
        name: "news",
        href: "/news"
    }
]

export default function Header() {
  return (
    <div className='flex gap-2'>
       <Navigation navLinks={navLinks} />
    </div>
  )
}
来看看效果:

Route Groups
app里的folder通常会被影射成url path,如果你不想folder被url映射,可以使用(folder)来标记,这样next.js就会忽略它 - 这就是Route Group
有了Route Group,你可以随意添加项目名 公司名 组织名 而不会影响路由
来看下面的例子(marking shop都会被忽略):

loading ui & streaming
example(注意Suspense的使用方法,不能包含多个页面/组件):
import { Suspense } from 'react'
import { PostFeed, Weather } from './Components'

export default function Posts() {
  return (
    <section>
      <Suspense fallback={<p>Loading feed...</p>}>
        <PostFeed />
      </Suspense>
      <Suspense fallback={<p>Loading weather...</p>}>
        <Weather />
      </Suspense>
    </section>
  )
}
Data Fetching
request on server
Next.js官方建议如果发送http请求,不管在什么情况下都请在server组件中,使用fetch() API 配合async/await
在server端发送http请求最大的好处就是你不用担心跨域的问题,而且还可以很好的屏蔽后端接口,让db更加安全
example:
async function getData() {
  const res = await fetch('https://api.example.com/...')
  // The return value is *not* serialized
  // You can return Date, Map, Set, etc.

  // Recommendation: handle errors
  if (!res.ok) {
    // This will activate the closest `error.js` Error Boundary
    throw new Error('Failed to fetch data')
  }

  return res.json()
}

export default async function Page() {
  const data = await getData()

  return <main></main>
}
默认情况下, fetch 会强制进行缓存,只要是重复请求,再次请求不会真实的去服务端查询,而是直接使用缓存,这样可以大大的加快页面的渲染速度
fetch('https://...') // cache: 'force-cache' is the default
如果希望每次请求的数据都是最新的,可以加上 cache: 'no-store'option.
fetch('https://...', { cache: 'no-store' })
Revalidating Data
要定期重新验证缓存数据,可以使用 fetch() 中的 next.revalidate 选项来设置资源的缓存生命周期(以秒为单位)。
fetch('https://...', { next: { revalidate: 10 } }) //超过10s会跳过缓存去真实服务器获取数据
Parallel Data Fetching
有时候需要同时请求多个接口:
import Albums from './albums'

async function getArtist(username) {
  const res = await fetch(`https://api.example.com/artist/${username}`)
  return res.json()
}

async function getArtistAlbums(username) {
  const res = await fetch(`https://api.example.com/artist/${username}/albums`)
  return res.json()
}

export default async function Page({ params: { username } }) {
  // Initiate both requests in parallel
  const artistData = getArtist(username)
  const albumsData = getArtistAlbums(username)

  // Wait for the promises to resolve
  const [artist, albums] = await Promise.all([artistData, albumsData])

  return (
    <>
      <h1>{artist.name}</h1>
      <Albums list={albums}></Albums>
    </>
  )
}
实际开发时,建议用这种写法,返回一个Promise:
async function getBlogByUUID(uuid:string):Promise<Blog>{
  const res = await fetch(`${BaseUrl}/xx/xxx?uid=${uuid}`,{ next: { revalidate: 1 }})
  // The return value is *not* serialized
  // You can return Date, Map, Set, etc.

  // Recommendation: handle errors
  if (!res.ok) {
    // This will activate the closest `error.js` Error Boundary
    throw new Error('Failed to fetch data')
  }

  const data = await res.json()
  return data.data
}
然后在组件中就可以这样使用:
const App = async ({params}:{params:{uuid:string}}) =>{
  const {uuid} = params
  const blog = await getBlogByUUID(uuid)
  return (
      <>
       {/*do something*/}
      <>
  )
}
request on client
客户端发送请求,建议使用axios,在使用axios前建议将axios进行封装, 避免重复性代码
import axios from "axios";

import {
  baseURL
} from "@/config"

const myAxiosInstance = axios.create({
  baseURL,
  timeout: 1000,
});

// Add a request interceptor
myAxiosInstance.interceptors.request.use(function (config) {
    // Do something before request is sent
    //get token from localstorage
    console.log("http request")
    config.headers['x-token'] = `${localStorage.getItem('token')}`;
    return config;
  }, function (error) {
    // Do something with request error
    return Promise.reject(error);
  });

// Add a response interceptor
myAxiosInstance.interceptors.response.use(function (response) {
    // Any status code that lie within the range of 2xx cause this function to trigger
    // Do something with response data
    console.log("Response")
    return response;
  }, function (error) {
    if (error.message.indexOf("Request failed with status code 401")>=0){
      window.location.href="/login"
    }

    // Any status codes that falls outside the range of 2xx cause this function to trigger
    // Do something with response error
    return Promise.reject(error);
  });

export default myAxiosInstance
or
import axios from "axios";

const myAxiosInstance = axios.create();
myAxiosInstance.interceptors.request.use(function (config) {
    /*...*/
    config.baseURL = "http://127.0.0.1:8999/api/v1"
    return config;
    },function (error) {
    // Do something with request error
    return Promise.reject(error);
});

export default myAxiosInstance
breakpoints
Tailwind CSS 提供了一套响应式设计的工具,它使用了一种叫做 “breakpoints” 的概念。Breakpoints 是一些预定义的屏幕宽度,当屏幕宽度达到这些预定义的值时,可以改变元素的样式。
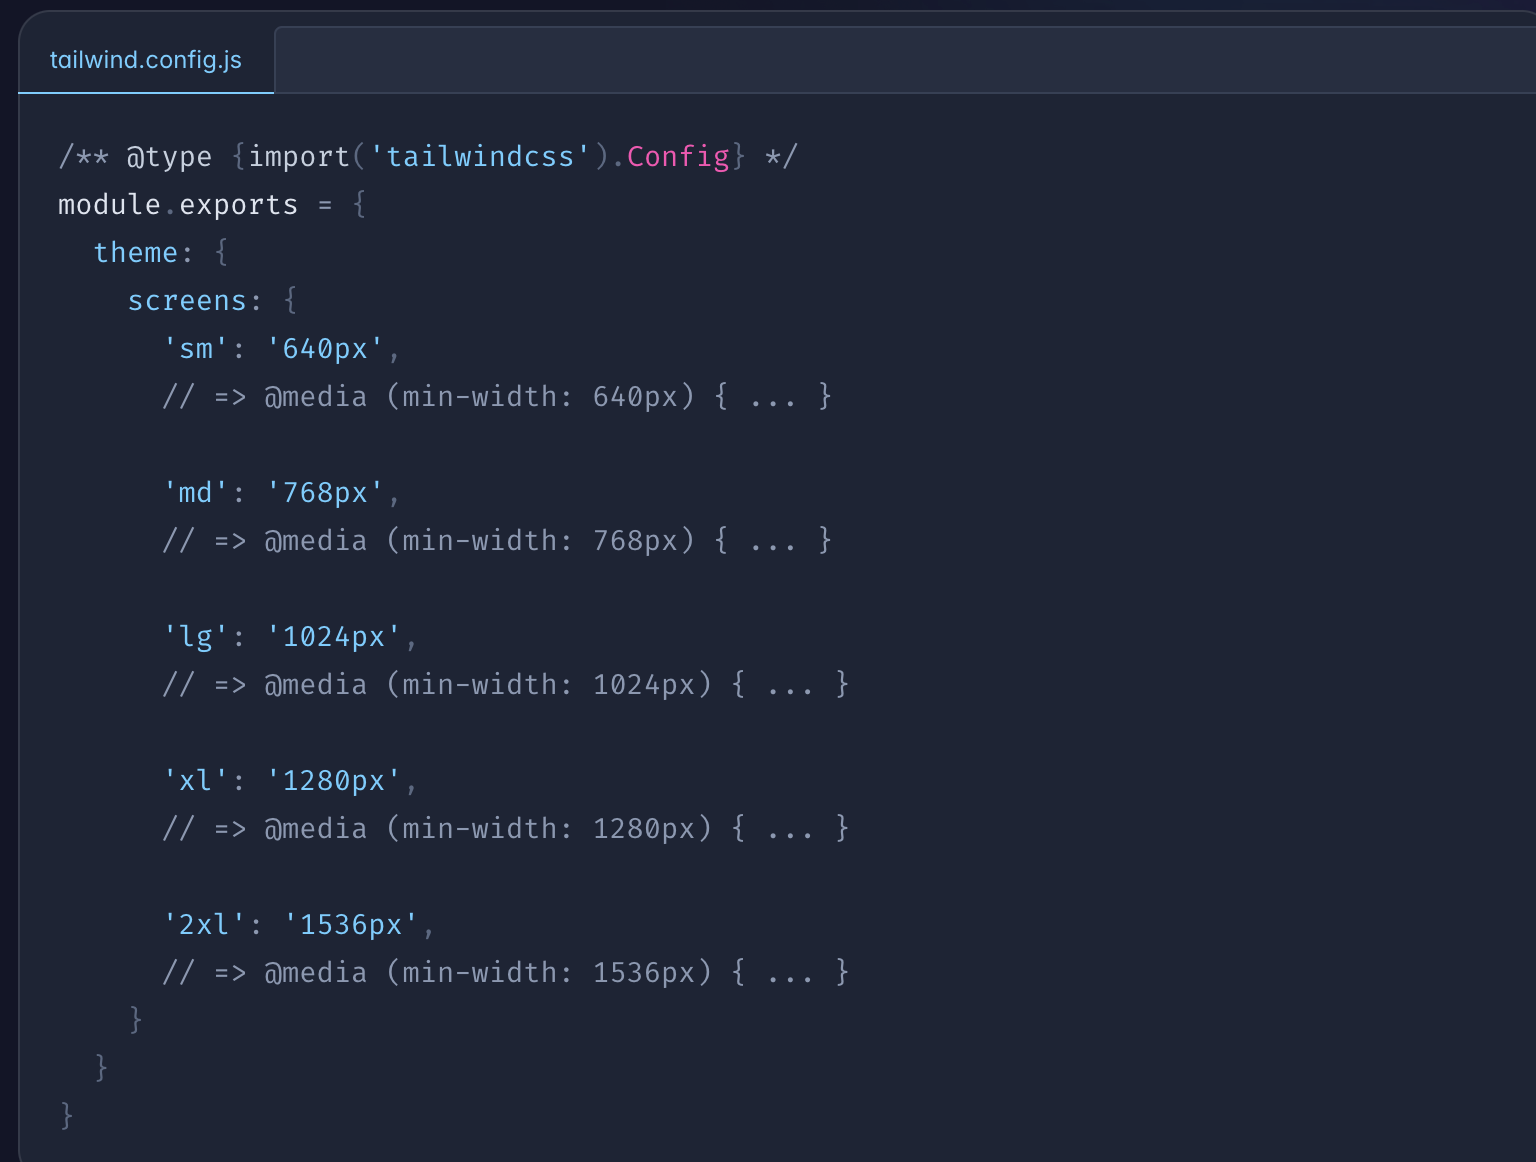
在 Tailwind CSS 中,你可以使用特定的前缀来指定在某个 breakpoint 下的样式。默认的 breakpoints 如下:
- sm: 640px
- md: 768px
- lg: 1024px
- xl: 1280px
- 2xl: 1536px
例如,如果你想在中等尺寸的屏幕(md)上隐藏一个元素,你可以这样写:
在你的代码中,md:hidden 就是一个使用了 breakpoint 的例子。这意味着当屏幕宽度达到 md(768px)时,这个 div 会被隐藏。
你也可以在 Tailwind CSS 的配置文件中自定义 breakpoints。
<div class="md:hidden">I'll be hidden on medium screens and up.</div>
在你的代码中,md:hidden 就是一个使用了 breakpoint 的例子。这意味着当屏幕宽度达到 md(768px)时,这个 div 会被隐藏。
你也可以在 Tailwind CSS 的配置文件中自定义 breakpoints。
在nextjs中使用redux
1, 创建store
你可以使用react16之前的老方法,也可以使用@reduxjs/toolkit, 不过还是推荐新方法
2, 封装Provider
"use client";

import { Provider } from "react-redux";
import store from './store'
import React from "react";

export function ReduxProvider({children}:{children:React.ReactNode}) {
    return <Provider store={store}>{children}</Provider>
}
3, 用Provider去包裹RootLayout根组件
import { ReduxProvider } from '@/provider'

export default function RootLayout({
  children,
}: {
  children: React.ReactNode
}) {
  return (
    <html lang="en" suppressHydrationWarning>
      <body>
          <ReduxProvider>
            {children}
          </ReduxProvider>
    </html>
  )
}
3, 连接store
可以参考: https://scott-xiong.com/docs-react/Redux%E8%BF%9B%E9%98%B6/a109cfed-9995-b382-974a-fdf67efafd65
其他小技巧
Image的使用
在使用nextjs的Image组件时,如果没有配置域名则会报如下类似错误:
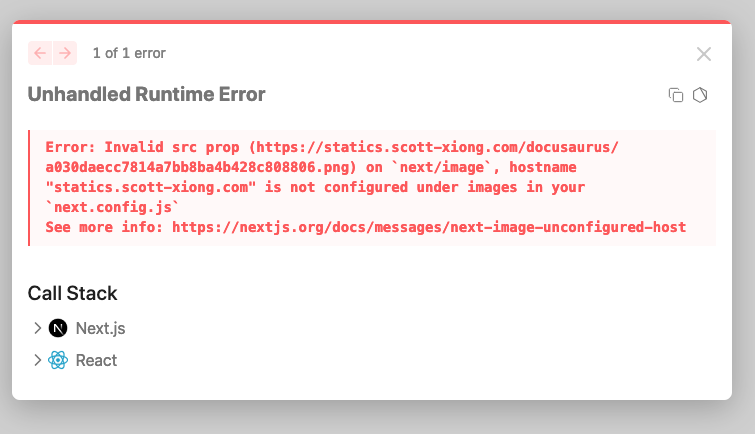
解决办法是在next.config.ts中加如下配置:
module.exports = {
  images: {
    remotePatterns: [
      {
        protocol: 'https',
        hostname: 'assets.example.com',
        port: '',
        pathname: '/account123/**',
      },
    ],
  },
}
路由重定向
next.js的路由重定向需要在配置文件中定义,如下:当加载/的时候重定向到/home
/** @type {import('next').NextConfig} */
const nextConfig = {
    async redirects() {
        return [
          {
            source: '/',
            destination: '/home',
            permanent: true,
          },
        ]
   },
   reactStrictMode: false,
}

module.exports = nextConfig
ios移动端input输入框聚焦的时候页面会自动放大
对于这个问题,我上网搜了下,好像ios都有这个问题,主流方法是 这个, 我尝试了里面所有方法,都失败了
最终在这里找到了答案

把下面的css设置为全局即可:
input, input:focus,
textarea, textarea:focus,
select, select:focus {
  font-size: 16px !important;
}
注意事项
1, npm run build时,google字体download不下来,会报错
需要在RootLayout中将其注解
// import { Inter } from 'next/font/google'
// const inter = Inter({ subsets: ['latin'] })
2, layout是自动继承的
你可以自定义自己专属的layout,如:
import Footer from '@/components/Footer'
import SearchHeader from '@/components/SearchHeader'

export default function Layout({
  children,
}: {
  children: React.ReactNode
}) {
  return (
    <>
        <SearchHeader/>
        {children}
        <Footer/>
    </>
  )
}
3, 客户端、服务端组件嵌套关系
绝不允许将服务端组件塞到客户端组件中
- 上一篇: viper